Once you’ve built your prototypes, it’s time to gather feedback from your users. It’s essential for you to optimize how you gather feedback, because you not only save time and resources but also learn more from your prototypes and test sessions. So, to help you maximize what you can learn from your tests, we’ll share six best practice tips on how to gather feedback, as well as three methods (with downloadable templates!) on how you can organize your feedback.
Six Best Practice Tips for Gathering Feedback on Your Prototypes
Gathering feedback is a crucial element in the design thinking process as well as all other human-centered design processes. To maximize the benefits of gathering feedback, however, you need to be purposeful about it. Here are some pointers to take note of when you gather feedback from your users.
1. Think of How to Solicit Feedback
How you solicit feedback from your users (or team-mates, if you are doing preliminary tests within your team) depends largely on what type of prototype you have built. For instance, if your prototype is a paper interface, you’ll need to conduct in-person tests with people and guide them through the process of using the prototype to gather feedback. Nevertheless, there are some general rules of thumb you can rely on to solicit better feedback.
First, consider testing several versions of your prototype. This helps to solicit critical feedback, because people tend to hold back on overtly criticizing prototypes. When you present people with alternatives, you allow them to compare the various prototypes and tell you what they liked and disliked about each version, so you will get more honest feedback.
You can also use the “I Like, I Wish, What If” method to solicit honest feedback in test sessions. This method helps your participants to voice their opinions in a critical but positive manner. We will cover more on this method, and provide a downloadable template for it, further down.
2. Test Your Prototypes on the Right People
To get the best results, you need to test on the right people. If you are in the early stages of your design project and just want some simple and rough feedback, it’s good enough to test on your team-mates. However, towards the end of your project, when you create more detailed prototypes, you should test on a representative sample of users to get the most relevant feedback.
On top of regular users, you can also test on extreme users. This helps you uncover problems that affect regular users, because extreme users tend to be more vocal about their love (or hate) of doing things related to your prototype. To find extreme users, you need to define a dimension relevant to your prototype. If you’re working on an idea related to supermarkets, for example, your extreme users could be parents with 8 children in tow who shop at the supermarket every day, and (on the other end of the scale) remote farmers who might do monthly orders, but only appear in-person at supermarkets perhaps once or twice a year.
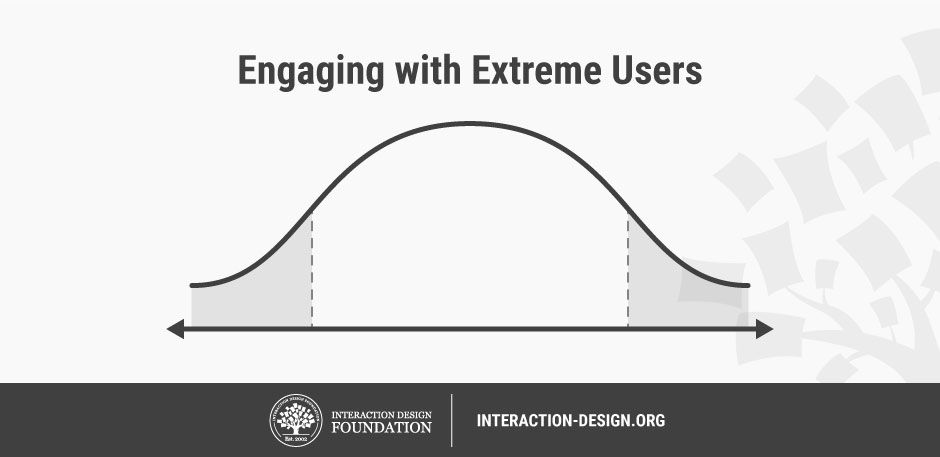
When you test on extreme users, you might gain insightful feedback.
© Teo Yu Siang and the Interaction Design Foundation, CC BY-NC-SA 3.0.
If your product or service serves an international audience, you should also test your prototypes across regions and countries. Different cultures and customs might affect how people use your prototype.
You should also get feedback on your prototypes at various stages from stakeholders other than your users. Internal stakeholders, manufacturers, retailers and distributors each have their own criteria for building, making or shipping your product, and can have an impact on your solution’s success. When you gather feedback from these stakeholders, you’ll prevent your team from receiving a nasty shock when you realize that you can’t implement the product as feasibly as you had believed.
3. Ask the Right Questions
Each prototype that you test should answer a few core questions. Before you test your prototypes, you should therefore figure out what exactly you want to test. For example, if you want to assess your product’s usability, then you should create tasks for participants to complete to test how easy your solution is to use. Subsequently, in a post-testing interview with each participant, you should focus on positive and negative feedback relating to usability.
At the same time, keep an open mind when you test your prototypes, even though you have a few questions you want to answer. Many times, test sessions can reveal key points on issues that your team did not even know to focus on. After testing, you should evaluate the feedback and decide if there are new questions that you should ask during future test sessions.
4. Be Neutral When You Present Your Ideas
When you present your prototypes to your participants, be as objective as you can. Refrain from trying to sell your idea. Remember that the goal of prototyping and testing is to find ways to improve your idea. When you over-sell your idea, you’re likely to reduce the likelihood of receiving accurate feedback.
Refrain from defending your prototype when your participants voice negative feedback. Instead, probe them further to find out what exactly is wrong with your solution. Don’t get too attached to your idea, and always be ready to dismantle, change or even abandon it when you need to. Remember, this stage is like a rehearsal, not the real “show”; you’re not being cut to pieces in the marketplace—in fact, when you make careful corrections that stem from negative feedback, you’ll greatly help your chances of success later on.
5. Adapt While You Test
Adopt a flexible mindset when you test your prototypes. For instance, if you realize that participants keep getting distracted by a nonessential part of your prototype, you can remove it to bring the focus back to the key elements of your prototype. Also, if you think your script for the test session does not work well, feel free to deviate from it to get the best feedback from your participants.
Even though you should adapt while you test, be aware that you shouldn’t change things up with every test session. Be flexible—within reason. After all, you need to perform the same test on multiple participants to get an accurate picture of how well your prototype works with the average participant. If you change things up in every test—for example, if you change your prototype or your script in each test—you’ll find it difficult to compare the results of different test sessions.
6. Let Your Participants Contribute Ideas
During your test session, allow your participants to contribute ideas to improve your prototype. You can ask your participants how the product or service could be improved, for example. Doing so would encourage participants to provide useful critiques as well as help improve your solution.
You can also turn some questions that your participants ask during the tests around—and ask them what they think. For example, if your participant asks you how to charge an electronic device, turn it around to ask them what they think would be the best charging method for the product. Even if you don’t adopt their ideas, you’ll get some insight about their key areas of concern.
You can download our guidelines in this template: “Six Best Practice Tips for Gathering Feedback on Your Prototypes”!
3 Methods to Maximize What You Learn from Tests
Usability tests are an art as much as they are a science. After all, most people are not familiar with how to provide feedback in the best way. Thankfully, you can use a few methods to give some structure and organization to your feedback-gathering process.
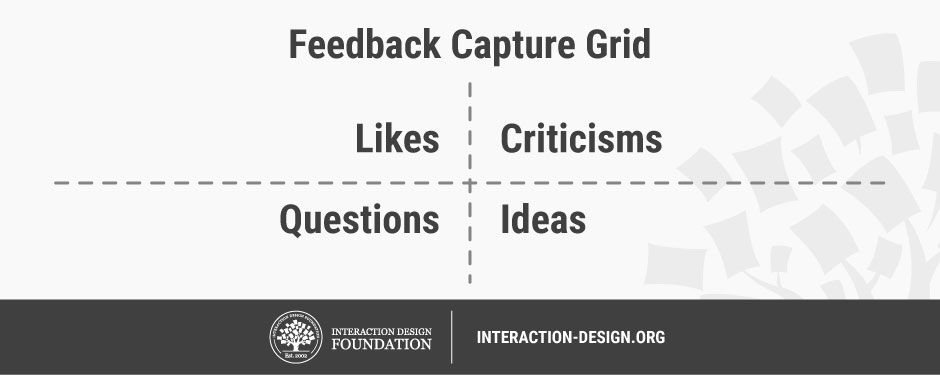
1. Feedback Capture Grid
© Teo Yu Siang and the Interaction Design Foundation, CC BY-NC-SA 3.0.
A feedback capture grid allows you to organize feedback in a structured way. You can use it during the test to capture feedback from your participants systematically, or after the test to organize the feedback you’ve gathered.
To get started, divide a sheet of paper into four quadrants. Label the top-left quadrant “Likes”—this is where you’ll note down positive feedback. The top-right quadrant is “Criticisms”, where you’ll capture negative feedback and criticisms. On the bottom-left quadrant is “Questions”, where you’ll write down questions that the participants have asked as well as new questions the test session raised. Lastly, the bottom-right quadrant is “Ideas”, where you’ll take down ideas that the test session had sparked.
Make sure each quadrant has at least a few notes. When you use the grid during a test session, for instance, you can steer the conversation towards quadrants that don’t have enough input.
To get help you get started, we’ve created a template on how to use the feedback capture grid method:
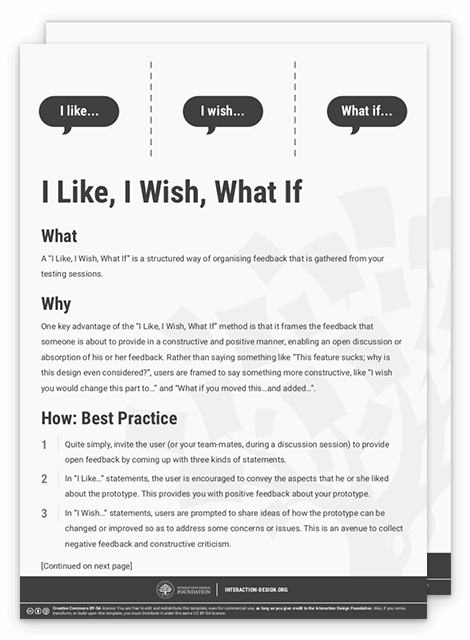
2. I Like, I Wish, What If

© Teo Yu Siang and the Interaction Design Foundation, CC BY-NC-SA 3.0.
“I Like, I Wish, What If” helps you gather feedback in a structured way. This is useful when your participants don’t have much experience with giving constructive critique. Quite simply, the “I Like, I Wish, What If” method invites the participant (or your team-mates, during a discussion session) to provide open feedback by coming up with three kinds of statements:
In “I Like…” statements, encourage your participants to convey aspects that they liked about the prototype. This provides you with positive feedback about your prototype.
In “I Wish…” statements, prompt participants to share ideas of how the prototype can be changed or improved to address their concerns. This is an avenue to collect negative feedback and constructive criticism.
Lastly, in “What If…” statements, ask participants to express new suggestions that might not have a direct link to the prototype. This opens up possibilities for new ideas that your team can then explore in future iterations of prototypes.
One key advantage of this method is that it frames participants’ feedback in a constructive and positive manner. This lets you openly discuss and absorb their feedback. Rather than prompt participants to say, “This feature sucks! Why did you design it like that?”, you help them say something more constructive, like “I wish you would change this part to…” and “What if you moved this…and added…”.
Please feel free to download and print our template for the “I Like, I Wish, What If” method:
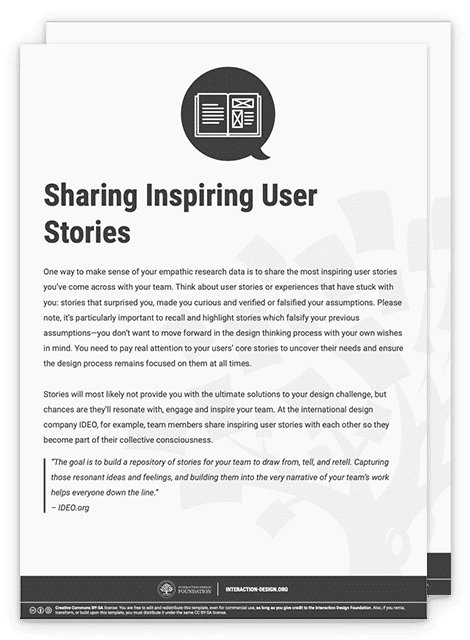
3. Sharing Inspiring Stories
© Teo Yu Siang and the Interaction Design Foundation, CC BY-NC-SA 3.0.
Stories are powerful tools that you can use to inspire yourself and your team. After you’ve done a round of tests with your prototypes, get together with your team and share inspiring stories with one another. When you capture what resonates with you and your team-mates, you’ll help identify ideas and feelings that your team can work on when they think of new solutions.
Here’s how you can build on the power of stories to help you absorb and organize your tests. One by one, you and your team-mates share a couple of interesting and inspiring stories you have observed while testing the prototype. Be as detailed as possible, and take down notes and observations about the stories on Post-its. Put up all the Post-it notes on a wall. You can then examine the stories you’ve shared and look for common threads and possible insights about your users and translate the inspiring stories into actionable next steps for the project.
To help you and your team get started, you can download our template for “Sharing Inspiring Stories”.
Build, Gather Feedback, Iterate
It’s useless to absorb feedback if you don’t put the new information into use in the next iterations of your prototypes. Given that, you need to develop a habit with your team to actively integrate what you have learnt back into your process, and consciously develop new iterations of your solutions as you move forward.
You can conduct a post-feedback discussion with your team to achieve this.
First, use the “Feedback Capture Grid”, “I Like, I Wish, What If” or “Sharing Inspiring Stories” method to gather and share the lessons you have learned with your team.
Next, discuss how to synthesize the feedback you have received. You can, for example, start a brainstorming session to generate ideas to integrate the feedback collected into your prototypes.
Finally, go out there and create your next prototypes. Have a bias towards action! Keep iterating your prototypes by constantly testing and integrating your findings, and eventually you will reach an optimal solution that addresses most of the key areas of your user needs.
The Take Away
It’s exciting to gather feedback on your prototype. To get the most out of your test sessions, you should optimize the way you gather. We’ve covered six tips for gathering feedback on your prototype:
Think of how to solicit feedback.
Test your prototypes on the right people.
Ask the right questions.
Be neutral when you present your ideas.
Adapt while you test.
Let your participants contribute ideas.
We’ve also introduced three methods for getting honest feedback: “Feedback Capture Grid”, “I Like, I Wish, What If” and “Sharing Inspiring Stories”. That way, you can maximize how much you learn from testing your prototypes. Lastly, make it a habit to use the feedback you have gathered to build new and improved prototypes—and keep working on that iterative process to move towards your final product or service.
References & Where to Learn More
IDEO, Human-Centered Design Toolkit, 2009
d.school, Bootcamp Bootleg, 2013
IDEO, Integrate Feedback and Iterate
IDEO, Share Inspiring Stories
Images
Hero Image: © Teo Yu Siang and the Interaction Design Foundation, CC BY-NC-SA 3.0.